Saturday, April 13, 2013

Light it up BLUE for Autism: Puzzle Picture Frame


April is Autism Awareness & Acceptance month! We've been brainstorming with a few ways to bring more blue into our life this month and wanted to share them with you!

One Dollar Store Puzzle. We got a 60 piece to allow for errors. Spread outside on drop-cloth, picture/glossy side up.

We used Rust-Oleum Plastic paint in BLUE.

Nice shiny finish. Let dry completely (20-30 minutes per manufacturer) Apply 2nd coat if needed.

Sort through pieces, and clean up edges. Remove glass from frame, or if using a mirror, cover with wax paper.

Arrange pieces around frame, gluing as you go. Clamp as necessary.

Let dry completely.

Vegetable Garden

It's National Gardening Month! Gardening is an activity the whole family can enjoy together, and there are so many wonderful lessons to be learned in the process. Important things like: Patience, consistency, gentleness & understanding where food comes from. Plant a garden with your kids this spring, and keep a journal about the process.


 The Easter Bunny brought vegetable seeds this year in Danny's Easter Basket, so let's see what we can grow!

Tuesday April 2nd

These are our vegetable seeds!


This is after we cracked open the clay pots.


Wednesday April 10th


This is one week later, The cucumber sprouted, and the peas that we added had sprouted.


Cucumber!

Friday April 12th


Cucumber still growing, Peas divided into 2 pots and a Tomato sprout!


Tomato!


Cucumber!


Peas!


Wednesday, April 10, 2013

Light it up BLUE for Autism : Painted Jar Art


Today we are making Painted Jar Art! 
We found the project idea here at: https://www.facebook.com/SuesCountryCorner


Photo: Mix Elmer’s glue with food coloring and paint it on to any glass to make it look like sea glass when dry. In a bowl, you will want to add one teaspoon of glue, three drops of food coloring and 1 1/2 teaspoons of water. 


Supplies needed are jars, glue, and food coloring, and water

We added 2 teaspoons glue and 1 teaspoon of water

add 3-4 drops of food coloring, and mix to a uniform consistency

Swish liquid around jar to coat (lids are helpful at this point)

Keep flipping and swishing until several "coats" are applied.

We let our jars sit overnight upside down on  a rack in the sink to drain the liquid, and this is what they looked like in the morning        

We added blue marbles and a flame free candle. LIGHT IT UP!

Stained Glass Jar


Tear 2 or 3 colors if tissue paper into about 1 inch pieces


Glue to inside of jar, slightly overlapping pieces

let glue completely dry

Add marbles and flame free candle. LIGHT IT UP!


Monday, April 8, 2013

Light it up BLUE for Autism: Puzzle Piece Suncatchers


Today we are making puzzle piece sun catchers!


First, trace large puzzle piece onto wax paper


I decided to make 2 suncatchers

grate candles or crayons in whatever colors you like to use

We are using blue and white

Place large piece of wax paper on ironing board. (you may want to protect the surface with an old towel  first) Then space out the piles of wax to fit your template. You do not need very much wax!


Place template on top.

Iron on low setting.

Cut out puzzle pieces.


If edges are separated, or damaged from cutting, just repress lightly with iron to seal


Glue ribbon on back


Hang outside

or hang inside. I had to extend the ribbon so they hang low enough to catch the sun.


Saturday, April 6, 2013

Light it up BLUE for Autism: Watercolor painting


Danny is ready to paint!

 
Paint with watercolors, and swirl with glue


add swirls or globs or write your name with glue. whatever design you like will work


sprinkle salt on your picture while paint and glue are still wet. a little? a lot? whatever you like


the salt will cause little starbursts of color,and when dry will sparkle!


Sunday, March 17, 2013

Cabbage science


If cooking cabbage is in your menu this St Patrick's Day, I have a great "science experiment" for the kids. Except it only works with red cabbage. Also needed are 3 other ingredients. Vinegar, baking soda, and lemon juice. (older kids can also try antacid tablets, laundry soap & ammonia, or try your own experiments)

After boiling the cabbage, eat it, but save the purple water lol

The older kids might like beakers, or glass jars, but a white piece of paper, or small plates will work well for younglings.

divide the cooled cabbage water into jars, beakers, or small puddles on white paper. Add a second ingredient with an eye dropper, or spoon to change the PH & the color will change. Very cool! Be careful when mixing ingredients, and have kids wear goggles and gloves if going beyond food ingredients. Always be safe!

With some of the test samples, the indicator will turn a pink color. That is your clue that you've tested an acid. Other samples should have turned the indicator greenish blue. Those are the bases. Now that you know what to look for, can you find other acids and bases in your kitchen?

CAUTION: Some acids are very dangerous to humans. Be careful not to get any of the samples on your skin, and never try to eat or drink things that you are experimenting with.


Boil red cabbage for about 10 to 15 minutes to get the desired color water. Enjoy eating the cabbage, as you won't need this for the experiments! Strain the water, and store in fridge until ready to use.


Divide cabbage water into as many containers as ingredients, plus one for a control. I suggest using less liquid than the shown photos. I would go for about half, as we needed a lot of test ingredient to get the color change.


We will be using vinegar, baking soda, and citrus juice


A) turned pink, when we added vinegar, B) turned Blue when we added baking soda, and c) turned pink when we added citrus juice  .D) Our control remained untouched so we could compare colors


Now see what happens when you add a base to an acid. Will it neutralize and turn back to the original color? What about if you add an acid to a base?


Also check out our book blog!  http://dannysmith0326.blogspot.com/

Wednesday, March 6, 2013

Bubble Art


I was browsing through the art and craft aisle looking for something to experiment with, and came up empty handed. Wandered to the seasonal aisle and was struck by an idea that I had a few years back when I tried to make colored bubbles for my photo scavenger hunt. The bubble color was not noticeably different, but when they popped, they splattered blue everywhere (which is the color of food dye I added). I wanted to take this a step further and see if we could capture it on paper.

Being almost Easter, and not knowing what my food color situation was at home, I grabbed a few egg color kits. I can always use them for something! I then found an 8 pack of bubbles for $2.00. A match made in heaven. We went home right away!


Here are our supplies!


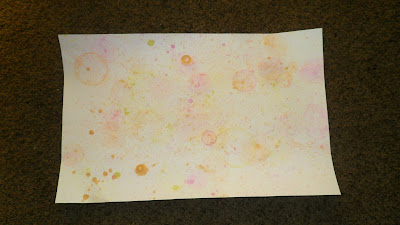
I added 1 color tablet to each bottle of bubbles . I don't recommend shaking the bubbles, but I did let them sit for 10-15 minutes to let the color tablet dissolve, and gave it a quick stir to mix. Here are a few of our masterpieces!


The longer the bubbles stayed on the paper without popping, the better the color circle.


This was really fun!
Also check out our book blog!  http://dannysmith0326.blogspot.com/